dairy free

Green Goddess Hummus

If you are familiar with my recipes, you know that I’m a BIG fan of quick, easy, AND delicious combinations. This hummus is one of those.

Loaded with quality protein (white beans, sunflower seeds, tahini, hemp hearts), fats (sunflower seeds, tahini, olive oil, hemp hearts) and carbohydrates (beans, tahini, spinach, parsley), this blend of nutrient powerhouses will definitely meet your energy demands and give your tastebuds a happy dance at the same time!

A note on White Beans:

Easier on Digestion than Garbanzo Beans: while I’m also a big fan of chickpeas, the butter beans have a tendency to be a little easier on the digestive system and, for those who struggle with chickpeas 👋🏽, the butter bean is a great substitute (and also provides a nice, creamy texture).

Degenerative Disease Prevention: Both beans and legumes contain a reliable source of non-digested compounds like fiber, phenolics, peptides and phytochemicals that are associated with reduced risk of many degenerative diseases, namely cancer and heart disease.

Cardiovascular Support: The high fiber quotient and mineral makeup of beans have been associated with lowered blood cholesterol and blood pressure, making them an important staple for cardiovascular disease prevention.

Fiber Content: Both beans and legumes have a diverse fiber profile, supportive of healthy digestion, and providing the body with good satiation, which may encourage healthy weight.

Quality Plant Protein: Consuming a diet high in quality plant protein will help keep the body satiated, energized, nourish the muscles, the brain, and support good immune, hormone, and digestive function. All beans are wonderful sources of plant protein and should be mainstays in a healthy, balanced diet.

Green Goddess Hummus

Makes aprox. 2 cups
1 can butter beans
1/3 cup tahini
2 cups packed baby spinach
½ cup packed parsley
¼ cup sunflower seeds
¼ cup hemp hearts
2 cloves garlic, minced
2 Tbsp fresh lemon juice
¼ cup olive oil
1 tsp cumin
½ tsp coriander
1 tsp salt
Fresh pepper
1 tsp maple syrup

  • Place all ingredients in your food processor and combine until smooth.

Morning Endurance Muffins

Muffins.jpg

This is my version of a morning glory muffin, but packed with a higher nutritional punch. We love these beauties because they are both robust and delicious and can get you through the morning hours without that blood sugar dip often associated with a morning muffin. As usual, the real food ingredients provide enough nutrition and macronutrient balance that the body will feel nourished and well fed. Yes, there are sweeteners in this muffin, but both maple syrup and coconut sugar are real food sugars with antioxidants, immune benefits, and lower glycemic index ratings.


Feel free to modify this recipe however you feel. If you are looking for a nut free version, simply remove the pecans and swap out the almond flour for a similar replacement flour such as sunflower seed flour (you can easily make this by blending sunflower seeds into a flour/meal in your food processor).


We love these muffins served warm, cut in half, with some coconut oil or almond butter, but straight up is perfectly lovely 😋

Morning Endurance Muffins

Muffins 3.jpg

Makes 12 - 16 muffins
Vegan, Gluten-free, Dairy-free, Plant-based, Super Yum

Ingredients:
2 chia eggs (2 Tbsp chia seeds + 6 Tbsp water)
1 overripe banana
1/3 cup maple syrup
1/4 cup applesauce
1/2 cup coconut sugar
1/2 cup almond milk (or other plant based milk)
1/4 cup coconut oil, melted
1 small apple, cored & grated
1/2 tsp salt
1 1/2 tsp baking soda
1 tsp cinnamon
1/2 tsp ground ginger
1/2 cup almond flour/meal
1 cup oat flour
1/2 cup oats
1 cup grated carrot
1/2 cup shredded coconut
1/2 cup raisins
1/2 cup pecans, roughly chopped
1/4 cup hemp hearts

Instructions:
To make your chia eggs, combine chia seeds and water in a small bowl and set aside.
Preheat the oven to 375F.
In the bowl of your food processor, place banana, maple syrup, applesauce, coconut sugar, milk, oil, grated apple, salt, baking soda, and spices and combine until smooth. Add flours, oats, and grated carrot and blend again, until just combined. Stir in remaining ingredients.
Spoon batter out evenly into lined muffin tins (12 - 16 muffins, depending on tin size).
Bake for 35 - 40 minutes, or until an inserted toothpick comes out clean and muffins are slightly browned on the outside. Cool & serve.

If you make these muffins, please let me know how they turn out for you AND if you make some modifications let us all know how they worked!! Happy Baking 💛

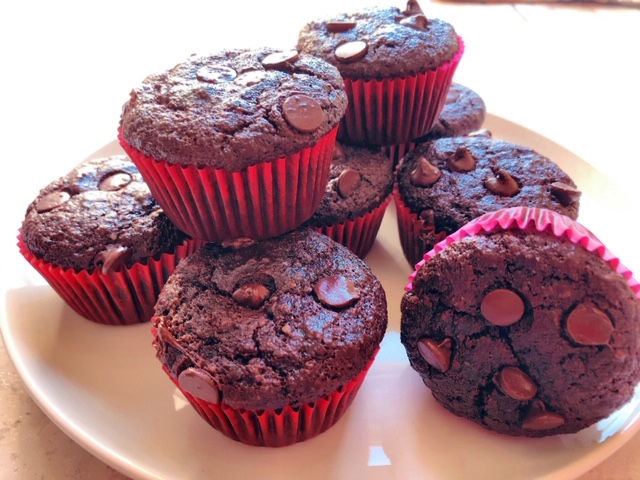
Double Chocolate Banana Cupcakes

Double Choc cupcakes.JPG

Yes these are decadent.
And chocolatey.
And an absolute treat.
And yes, you could make these for a birthday party or special occasion.
And yes, all taste buds would be satisfied and delighted and wonder where you got the recipe 😉
But.
BUT.
No, you needn’t wait.
No, you needn’t deny yourself these delicious chocolate banana cake-like delights, simply because no one is having a birthday or a party or an event of any kind at all.
Just make them because they are yummy and satisfying. No guilt. No shame. No negative BS of any kind necessary at all.
YES! You have my approval & support. Make these cupcakes just because you want one and eat it with intent and enjoyment and explore the sensory experience and feel really good about it.

Inspired by overripe bananas and a, perhaps hormonally encouraged, desire for something chocolate, these are SOOOOOOOO good. And easy. And if you eat anything like we do at our house, you’ll have most of these ingredients, if not all, on hand. Please enjoy them in a way that feels good to you. If you have a tendency to eat too many goodies when you have them hanging around then share them with your neighbours or friends or your neighbours friends or pop them in the freezer and eat one every now and again ☺️

Double Chocolate Banana Cupcakes

Choc cupcakes.JPG

Makes 12 Regular Size Cupcakes
Prep & Bake Time: 35 minutes

Ingredients:
2 large overripe bananas (really really dark brown & gross looking is best!)
2 Tbsp maple syrup
3 large eggs
2 cups almond flour
1/2 cup cacao powder
1/2 tsp salt
1 tsp cinnamon
1/2 tsp baking soda
3 Tbsp hemp hearts
2 tsp vanilla
1/3 cup coconut sugar
3/4 cup good quality chocolate chips

  • Preheat the oven to 350F and line a muffin tray with muffin cups.

  • In a large mixing bowl, mash banana with a fork until mushy and smooth. Add all other ingredients, except chocolate chips, and continue to mix with a fork. Finally, mix in 1/2 cup of chocolate chips and spoon out batter into your lined muffin cups.

  • With the last 1/4 cup of chocolate chips, sprinkle tops of muffins with roughly 3-4 chips and lightly press them into the batter.

  • Bake for 20 - 25 minutes until set and an inserted toothpick comes out clean. Allow to cool before serving, then devour!

    If you make these cupcakes, please let me know how they turned out for you!! Leave me a comment here or better yet, share a pic on instagram and tag me so that I can see your beauties!


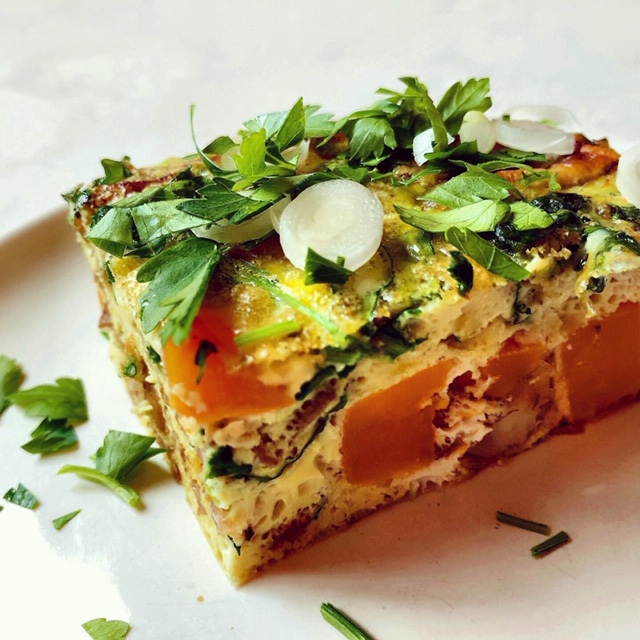
Butternut Quiche with Caramelized Onions

Quiche slice.JPG

This beautifully flavoured quiche is a wonderful dish for a crowd or a special Sunday morning brunch. I recently served this up to a group at a retreat, and they were SO in love that they have inspired me to share the recipe on the website.
You will need a bit of time to caramelize the onions and roast the squash, but the steps in this dish are so worth the time commitment 😉
As always, feel free to modify the recipe to suit your taste buds and preferences. You can easily swap out the butternut for a different squash or add sautéed mushrooms and/or sun-dried tomatoes. Keep in mind that because the onions are caramelized, there is a bit of a sweet taste to this quiche, so modifying too much might work against you.

Butternut Quiche with Caramelized Onions

quiche in pan.JPG

Serves 6
Dairy-free, Gluten-free

1 medium onion, sliced
1 Tbsp avocado oil
2 Tbsp balsamic vinegar
1/2 small butternut squash, cut into 1/2” cubes
2 Tbsp coconut oil
Salt & pepper
7 eggs
1/4 cup full fat coconut milk
1/2 teaspoon salt
½ tsp dried sage
1/4 tsp dried thyme
¼ cup nutritional yeast
1 cup packed fresh spinach, chopped
Fresh parsley, green onion, tomato slices, and/or avocado for serving

  • Preheat oven to 400 degrees.

  • Slice one large onion and place into a large saucepan. Add avocado oil and balsamic vinegar. Cook the onion slices on medium/high, stirring frequently. Once the onions start to get translucent, turn the heat to medium/low and cook until they start to caramelize. This will take roughly 30 minutes.

  • While the onions are cooking, cut the butternut squash into 1/2″ cubes and place in an 8x8 glass dish, coat with 2 Tbsp coconut oil and season with salt and pepper.

  • Roast the squash for 20 - 25 minutes, until slightly softened.
    Once squash is done, lower the oven temperature to 375 degrees.

  • Let the squash and onions cool slightly. Combine the eggs, coconut milk, spinach, dried herbs, butternut squash, and caramelized onions in a large bowl. Mix well then pour back into your 8x8 glass dish still greased from the squash.

  • Bake for 45-55 minutes, or until the centre of the quiche is set - you can check by simply wiggling the pan slightly to see if the eggs are firm. Serve with parsley, green onions, fresh tomato, and/or sliced avocado.

    If you make this recipe, please leave me a comment and tell me how it turned out for you!! I’d love to hear from you 😊

Creamy Vegan Coleslaw with Tangy Cashew Dressing

Coleslaw.JPG

We often don’t give coleslaw enough credit. It shows up around bbq season as a potluck companion, weaving in and out of our spring and summer evenings without much fuss: neither a fan favourite, nor a neglected dish.
When asked about coleslaw, most just shrug with a bit of a “meh” approach.
Poor coleslaw.

Let me attempt to change your thoughts on coleslaw, my friend.

There’s a few ways to “do” coleslaw.

#1: Dump out a plastic bag of pre chopped cabbage and squeeze on top some kind of goopy dressing containing weird ingredients coming from a weird package .
#2: Buy a head of cabbage, shred it, add mayo + celery salt + lemon and call it coleslaw.
#3: Put a little thought and time into your coleslaw making: finely shred cabbage by hand, add a few other tasty vegetables, some fresh herbs, and create a delicious & health supportive dressing that serves both your body AND your taste buds 😋

In general, the more you put in to your food, the more you will get out of it.
And a little effort can really go a long long way!

What I love about this recipe is that it’s versatile, but also a bit more interesting than your average bag + dressing coleslaw 😉. I’ve tossed in some shredded kale and fresh herbs for green, added flavour, but also to increase the nutrient quotient of the dish. The dressing is practically a nutrient powerhouse all on its own, with fermented coconut milk, cashews, fresh lemon, apple cider vinegar, and garlic!

What’s in it for you?

  • Cabbage: anti-inflammatory, anticancer, antioxidant, supports digestion, cardiovascular function & boosts immunity. High in calcium, magnesium, phosphorus, potassium, folate, and Vitamin C.

  • Kale: supports healthy skin & hair, improves digestion, reduces inflammation, lowers blood pressure, improves vision and is anticancer. High in calcium, magnesium, phosphorus, potassium, Vitamin C, A, & K, and folate.

  • Coconut Kefir: detoxifying, promotes healthy gut bacteria & improved digestion, reduces inflammation, supports liver & brain health, anti-fungal, anti-bacterial, anti-candida, and supports a strong immune system.

  • Lemon: improves heart health, prevents kidney stones, reduces indigestion, detoxifying, promotes healthy teeth, hair, & skin. High in Vitamin C, calcium, & potassium.

Creamy Vegan Coleslaw with Tangy Cashew Dressing

Coleslaw dressed.JPG
cashew dressing.JPG

Ingredients:
Serves 8 - 12
1 large head of green cabbage, shredded thin
1/2 large head of purple cabbage, shredded thin
1 bunch of lacinato kale, stemmed & chopped thin
3-4 large carrots, peeled and grated
1/2 bunch of parsley, chopped
1/2 bunch of dill or cilantro, chopped
1 bunch of green onions, diced
1/2 cup sunflower seeds, toasted
Dressing:
1/2 cup cashews, soaked overnight (see note)
1 cup coconut kefir or yogourt (preferably homemade - will post a recipe for this soon!)
1/3 cup fresh lemon juice
1/4 cup apple cider vinegar
2 Tbsp Dijon
1 tsp salt
1 tsp onion powder
1-2 cloves garlic, minced
Fresh pepper
2 tsp maple syrup for a sweeter dressing (optional)

  • Prep the salad by preparing all ingredients, except sunflower seeds, and tossing them in a very large bowl.

  • For the dressing, combine all ingredients in your high speed blender and combine until smooth.

  • Toss the salad with the dressing until evenly distributed and well coated. Allow to marinate for at least 2 hours before serving.

  • Before serving, add in your toasted sunflower seeds and garnish with more fresh herbs if desired. Enjoy!


Creamy Coconut Carrot Soup

Carrot soup .jpg

A simple weekday dinner or a fulfilling lunch, this soup is super simple to put together, nourishing for the belly and the soul, as well as totally delicious!
We tested this soup on a room full of 6 and unders, and got some super happy smiles and thumbs up from the littles and many happily surprised: “what did you put in that soup?” reactions from the parents. Always a huge compliment!

HINT: To make this soup taste extra amazing, make your own veggies stock: simply bring a pot of water and a bunch of loosely chopped vegetables to a boil, add salt, pepper, and any other desired herbs & spices, reduce heat and simmer for as many as 4 hours on low (I like to sauté the onions with some garlic & ginger with a bit of coconut oil first to add a bit of flavour). Strain out vegetables and here you have a delicious & simple vegetable broth. This kind of broth is great to make in the height of market season when there are loads of imperfect root vegetables like celeriac, parsnip, yams, potatoes, celery, carrots, & broccoli, just hanging about. YUM!

Creamy Coconut Carrot Soup

Creamy coconut carrot soup.JPG

1 large onion, diced small
3 Tbsp coconut oil
1 tsp salt
2 ½ Tbsp minced ginger
1 large or 2 small cloves garlic, minced
1” fresh turmeric, minced
2 cups carrots, peeled & chopped
4 cups vegetable stocks
1 can full-fat coconut milk
½ cup toasted pumpkin seeds, for serving (optional) or toasted large flaked coconut 😋

  • In a large soup pot, melt coconut oil and onions over medium heat. As onions become soft & translucent, add salt, ginger, garlic, turmeric, and carrots. Cook for about 10 minutes, stirring frequently, until carrots are slightly softened and mixture is fragrant.

  • Add vegetable stock, bring to a boil and then reduce to a medium-low simmer for 15 minutes. Add coconut milk and simmer another 5 – 10 minutes.

  • Serve with a sprinkle of toasted pumpkin seeds and/or a spoonful of coconut cream.

Like always, if you make this soup, please let me know how it went!
AND, if you don’t want to miss any upcoming recipes, be super to sign up for my email list below! I promise to only send out inspiration, upcoming class info & deliciousness!!

Green Curry Soup with Sesame Tofu

Curry soup 1.jpg

Warming to the soul, gentle on the belly, and all around satisfying, this is a soup that is incredibly versatile in that you can throw in any veggies you have lying around, serve with soaked brown rice for the big eaters (did I say teenager?) or swap in chicken for tofu, if that’s your fancy.
I find this recipe quick & easy because these are all ingredients that I mostly have in the house, so long as I have about a 25 minute window to get dinner on the table, this soup can make that happen!

But first, a quick word on Tofu…

A while back, we were a bit scared off of soy in the health industry due to its phytoestrogen content. Phytoestrogens are plant compounds and dietary estrogens that can only be consumed through food sources. Due to increases in hormone dysfunction and estrogen dominance issues in both men and women, there have been concerns about the regular consumption of phytoestrogens and their affect on thyroid function, reproductive development, and breast cancer risk. Like so many foods, the consumption of estrogen containing foods is problematic for some and beneficial for others.
As with all fluctuations in nutritional information, is it always important to do what is right for you, as an individual, with differing preferences, needs, history, and health struggles. If consuming estrogen of any kind is problematic for you, likely it is safest to steer clear. For many others, consuming tofu as part of a balanced, plant-based diet, can be health promoting.

Why consuming Tofu could be beneficial:


Soy consumption may actually lower your risks for breast cancer:

“Estrogen has positive effects in some tissues and potentially negative effects in others. For example, high levels of estrogen can be good for the bones but can increase the likelihood of developing breast cancer. Ideally, you’d like what’s called a “selective estrogen receptor modulator” in your body that would have proestrogenic effects in some tissues and antiestrogenic effects in others.
Well, that’s what soy phytoestrogens appear to be. Soy seems to lower breast cancer risk, an antiestrogenic effect, but can also help reduce menopausal hot-flash symptoms, a proestrogenic effect. So, by eating soy, you may be able to enjoy the best of both worlds. “1

More good news:


”According to Marji McCullough, ScD, RD, strategic director of nutritional epidemiology for the American Cancer Society, epidemiologic studies that followed large populations of healthy women for many years either have shown no association between soy and breast cancer or a protective association from eating soy. Even breast cancer survivors may not need to worry. Three studies looking at women’s eating habits and other lifestyle factors after breast cancer found that, in the combined total of 9,000 breast cancer survivors studied, eating soy actually lowered the risk of breast cancer recurrence, even in women with estrogen receptor–positive tumors (although less so), and regardless of whether they were taking tamoxifen.”2

As with all foods that have been processed in any way, choosing the right kind makes all the difference!

  • Choose organic & non-GMO

  • Check the label for weird preservatives & added “flavours”

  • Buy plain (I prefer firm) and marinate yourself - keep reading for a super delicious & versatile marinade

  • Buy sprouted or fermented where possible - these will be more digestible & will make the nutrient value more accessible

My favourite, locally processed Tofu:

Silver king tofu.jpg

No, we are not affiliates, I just like their product and always love to support local as much as possible!

Ok, so now that you’ve expanded your knowledge base on tofu 🤓, you’ve earned the recipe!

Green Curry Soup with Sesame Tofu

Sesame baked tofu.jpg

For the Sesame Baked Tofu:

1 block of tofu drained (I like to slice it into 1/2 - 1” slabs and wrap it in a tea towel on a plate. Then I’ll put lots of weight on top to drain all the water out, usually a large stack of plates, and leave it to drain for an hour or so)
3 Tbsp wheat-free tamari
1.5 Tbsp sesame oil
Lots of fresh pepper

Cut drained tofu into small cubes and toss with all other ingredients in a medium bowl. Allow to marinade for roughly 1/2 an hour. Bake @ 350F for 35-40 minutes, stirring and flipping cubes occasionally, until browned and a bit crispy. Remove from oven and set aside.

For the Soup

Curry soup close up.jpg

1 large onion, diced
3 Tbsp coconut oil
1/2 tsp salt
1 Tbsp minced fresh ginger
3-4 cloves garlic, minced
1 1/2 cups chopped cauliflower
1 1/2 cups chopped broccoli
1 cup diced or thinly sliced red pepper
4 cups vegetable stock
1 can full fat organic coconut milk
3 Tbsp green curry paste
1 Tbsp sesame oil
3 Tbsp wheat-free tamari
1 Tbsp maple syrup
Fresh pepper
1 recipe sesame baked tofu
2 large handfuls of chopped kale/swiss chard/spinach or a blend
Lime wedges for serving
Fresh cilantro for serving

  • In a large soup pot, sauté onion with coconut oil and salt over medium heat until softened. Add ginger, garlic, and cauliflower, broccoli, & red pepper, and sauté another few minutes until fragrant.

  • Add stock, coconut milk, curry paste, sesame oil, tamari, maple syrup and pepper, and stir well with a spatula to remove any clumps. Bring to a gentle boil, then reduce heat to low and allow to simmer for 20 - 30 minutes or until all vegetables are soft but not mushy.

  • Add tofu and greens and allow greens to wilt and tofu to heat through. Serve with a squeeze of lime and fresh cilantro. You may wish to add a few scoops of rice, quinoa, or rice noodles for a larger, more dense meal. Enjoy!

If you make this soup, please let me know how it goes!! Better yet, take a most beautiful pic and post it on Instagram or Facebook and tag me 😋! I want to know if you are using my recipes!

Don’t want to miss a recipe or an upcoming workshop? Sign up for the Newsletter below!


Resources:

1 - Greger, Michael, M.D., FACLM, “How Not To Die”, pg. 195
2 - Thalheimer, Judith C., RD, LDN, https://www.todaysdietitian.com/newarchives/040114p52.shtml

Double Layer Almond Chocolate Fudge Cake with Chocolate Avocado Frosting

Chocolate Cake.jpg

The time has finally come to post this birthday cake!! 🤪

Every February, my son’s birthday comes around, and I find myself so busy trying to plan a party, come up with a cool gift, make awesome party food, hammer out a delicious AND nutrient rich birthday cake, while meeting all the requirements of the birthday boy…that when and if the time comes to write out the cake recipe and post about it, I’m just too bagged!

Well, this year is different, my friends.

Although none of the above changed in any way, I have taken the time this year to get this recipe to you because it has FINALLY become my favourite, decadent, no-non-food-weirdness-ever, chocolate birthday (or anyday) cake!! And it has been officially taste tested by a pack of the harshest critics….11 year old kiddos!

Several years in the making, here’s a birthday cake that can accommodate all the dietary restrictions, make all the tastebuds sing, is moist and not overly dense, AND satisfies my NUTRITIONISTA REAL FOOD requirements (which is not always that easy!).

Double Layer Almond Chocolate Fudge Cake
with Chocolate Avocado Frosting

Chocolate Cake Side.jpg

Ingredients:
3 cups almond flour
1/4 cup coconut flour
3/4 cup cacao powder
1/2 cup coconut sugar
2 tsp baking soda
1 tsp salt
3 eggs, room temperature (for a vegan cake, replace eggs with 3 flax or chia eggs)
1 can full fat coconut milk
1/2 cup coconut oil, melted
1/4 cup applesauce
1 Tbsp vanilla
2 Tbsp maple syrup
Chocolate Avocado Frosting:
1 cup dark chocolate chunks
1/4 cup coconut oil
3 ripe avocados
1/2 tsp salt
1 Tbsp vanilla
1/4 cup cacao powder
1/4 cup maple syrup
Instructions:

  • Line 2 x 7” cake pans with parchment paper and lightly grease them with coconut oil. Preheat the oven to 350F.

  • In a large bowl, whisk together the flour, cacao powder, sugar, baking soda & salt, until there are no lumps or clumps.

  • In a separate medium bowl, combine eggs, coconut milk, oil, applesauce, vanilla, and maple syrup, and whisk together until smooth. Pour wet ingredients into the dry mix and combine gently with a large spatula. Do not over-mix.

  • Pour evenly into your 2 cake pans and bake for 30 - 40 minutes until an inserted toothpick comes out clean. Cool completely, preferably overnight, before frosting.

  • For the frosting: In a double boiler (or a glass bowl set over top of a medium pot with a few inches of water) melt chocolate chunks and coconut oil until runny. Transfer melted chocolate mix to the food processor and add in all other ingredients. Combine until smooth and thick. Adjust sweetness as desired (dark chocolate chunk sweetness will vary).

  • For cake assembly: Remove one cake from pan (don’t forget the parchment!) and place on a large serving plate. Evenly spread a thick layer of frosting over the top of the cake (I like to use a small spatula or a bread knife for this). Carefully remove the second cake from its pan and set on top of the bottom layer. Spread all remaining frosting over the top and along the sides of the cake to cover completely. Cake will keep on the countertop for roughly one day, refrigerate leftovers (if there are any 😉).

If you make this cake, please drop me a note with your feedback or kitchen dancing enthusiasm!! I want to know how it went and if I need to make any adjustments to the recipe!
Happy cake making celebration 🎉


Bonk Bars

Bonk-Bars-Star-.jpg

I have to admit that I have a big time soft spot for my Bonk Bars.
They were one of my first original recipes that people were really excited about. On top of that, the honest-to-gosh-golly-goodness truth is that I just LOVE them SO much. They are my absolute favourite bar to have hanging around when I’m training for a distance run, rehearsing like mad for a dance show, or just being the busy body, high-functioning human that I am. They are THE perfect afternoon slump, pick-me-up bar with all those great combinations that we love so much: macronutrient balance, nutrient-density, and total flavour jam!

These bars were inspired by a good friend who is hypoglycemic and tends to “bonk” (have a blood sugar crash inducing fits of rage and/or extreme grumpiness) if he doesn’t eat good food regularly.  Loaded with blood-sugar stabilizing fiber (dates), fats (coconut oil & chia), proteins (nuts & seeds), complex carbs (oats), and natural sweetness, these are fool-proof bars for active people, athletes, teenagers, regular “bonkers”, and sweet-treat lovers everywhere. Easy to throw together and incredibly satisfying, these will keep well for weeks in the fridge (I dare you to try) and freeze well too!
Stay grump-free.
Look out for your friends.
Prevent “Bonking”.

Print

Bonk Bars

Prep Time: 20 minutes

Total Time: 20 minutes

Category: Snack, Healthy Treat, Power Snack

Cuisine: Vegan, Real food, Nutrient-dense, Vegetarian, Raw

Yield: 16 bars

Bonk-Bar-Stack-LG.jpg


Ingredients

  • 1 cup medjool dates

  • 1 cup almond butter

  • 1 cup oats

  • 3 Tbsp coconut oil, melted

  • ¼ cup sunflower seeds

  • ¼ cup sesame seeds

  • ¼ cup pumpkin seeds

  • ¼ cup shredded coconut

  • 3 Tbsp chia seeds

  • 1/4 tsp salt

  • 1/4 cup raisins

  • 1/4 cup chocolate chips

  • ¼ cup goji berries (mulberries/golden berries)

Instructions

  1. Soak dates in boiled water until soft (about 7-10 minutes).

  2. In food processor, combine dates and almond butter until smooth. Add oats and coconut oil and pulse until roughly combined. Transfer mixture to a large bowl.

  3. Add all remaining ingredients and combine.

  4. Pour into a lined 8 x 8 square pan and press down with wet hands until evenly distributed and smooth.

  5. Refrigerate for at least 1 hour before cutting into squares. Store in fridge.


If you try these Bars and love them (or not), let me know how they worked out for you!!

Love these? Want more recipes like this? Check these out:
Sesame Chocolate Power Balls

The Ultimate Cookie

Coconut Banana Muffins

Banana-Muffins-tray-.jpg

Our summer has finally chilled out enough to turn my oven back on and it’s good timing because my boys were craving some muffins and I was dying to create.  I also happened to have some pretty brown, fruit fly lovin’, bananas begging to be a part of something fantastic!

These muffins are vegan, gluten-free, and as sweet as brown are your bananas! (The browner the better). Note: if your bananas aren’t quite there yet, pop them in a brown paper bag overnight to quicken the ripening period.

Coconut Banana Muffins

single-muffin.jpg

Ingredients:

2 cups DIY gluten free flour blend (I use this one)
1 tsp baking powder
1 tsp baking soda
1/2 tsp himalayan sea salt
4 large, very ripe, bananas
1/2 cup coconut sugar
1/4 cup coconut oil, melted
1/2 cup coconut cream (if you don’t have any coconut cream, scoop off the cream from a can of coconut milk)
2 tsp vanilla extract
1 cup shredded, unsweetened, coconut (1/4 cup reserved)
1/3 cup high cacao content chocolate chips

Instructions:

  • Preheat oven to 350F. Line muffin tin with parchment paper or reusable silicon liners.

  • In a large bowl, combine the flour, baking soda, baking powder, and salt, and whisk together.

  • In a medium bowl, mash bananas with a fork. Add in sugar, oil, cream, and vanilla, and combine. Pour wet mixture into dry and stir with a large spoon.  Stir in 3/4 cup of shredded coconut and chocolate chips.

  • Spoon muffin mix into the tins and sprinkle with remaining coconut.

  • Bake for 22-25 minutes until slightly brown around the edges and an inserted toothpick comes out clean.

  • Cool completely and store covered with a dish towel to enable air circulation.

Note: I like to set half the batch aside to freeze for lunches and watch the others get devoured in just a few days. Enjoy!